Kohlrabi and Minced Meat Quiche

Yes, I have a thing for Kohlrabi at the moment. I get nervous when I don’t have a bulb lying around. And I’m constantly trying to find new recipes to use them in.  But more on that later.

This autumn, I’ve discovered, to my own surprise, that I prefer autumn and winter vegetables to summer vegetables (tomatoes probably being the only exception). The variety is huge, the flavors and colors are so inspiring and exciting. For a long time, at least here, the typically Mediterranean vegetables, like aubergine and zucchini, have been The Thing to cook with as they’ve been promoted as part of a light and healthy cuisine. And a lot of people, including me, have been using them throughout the seasons in their cooking, which left little space for the local seasonal produce, like all sorts of cabbage, turnips, beets, parsnips, Jerusalem artichokes, squash, kohlrabi and all the other beauties that are so abundant here in autumn and winter.

A lot of magazines, cookbooks, and of course blogs, now feature recipes with these beautiful vegetables and this, combined with my efforts to buy and cook local and seasonal, have thankfully made me (re)discover these flavors.

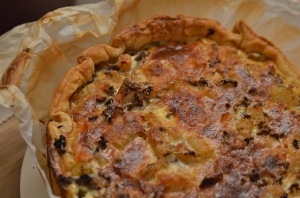
Now back to the Kohlrabi. I really wanted to use it in a quiche or tart, but while browsing the internet, I couldn’t find any recipes that sounded particularly appealing (at least they didn’t address the particular craving for something hearty and rustic I had at that moment). So I came up with this recipe that I based on the two main ingredients I wanted to use, kohlrabi and minced meat. The rest of the recipe came together as I worked. I’ve now made it several times and had the opportunity to twist around a few things. For example, I found that it worked even better with a high edge crust than with a typical tart crust as the filling turns out even more juicy. The dimensions I used in the quiche as photographed are a ø 22 cm tin with an approximately 4 cm high edge. But you could of course make it with a larger crust in diameter and a lower edge.
Kohlrabi

Kohlrabi quiche prep

Ingredients:

– 1 ready-to-use or homemade crust (yes, I’ll have to post my homemade recipe one day but the problem is I keep trying different recipes   and I haven’t really found a favorite yet, so I’ll keep trying for a while)
– 2 tsp olive oil
– 350g minced beef
– 1 medium sized onion, chopped
– 1 clove of garlic
– 1 large Kohlrabi (or two small ones), cut into cubes
– 1 large carrot, sliced
– 200ml beef stock
– 3-4 sprigs of fresh parsley
– 2 tsp chopped fresh chives
– 3 eggs (preferably organic)
– 3 tbsp cream cheese (Philadelphia style)
– 100ml single cream
– 250ml full fat milk
– 2 tbsp parmesan
– 1 tsp cumin
– 1 tsp grated nutmeg
– freshly ground salt and pepper to taste

Directions:

Preheat the oven to 180°C.
Carefully place the crust in your baking tin. Cover the crust with baking paper and dry beans or baking weights and blind bake for 15 minutes.

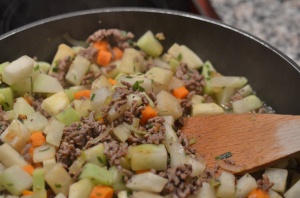
In the meantime, heat the olive oil in a frying pan over high heat. Add the minced beef and brown it, stirring frequently until it’s cooked and evenly browned. Reduce the heat to medium. Add the onion and fry until translucent. Add the garlic, kohlrabi and carrot and fry for two minutes, stirring from time to time. Add the beef stock, cover the pan and simmer for about 20 minutes or until the kohlrabi has softened and the liquid is absorbed. Add the cumin and adjust the seasoning with salt and pepper if necessary.

By now, the crust should be ready to come out of the oven. Discard the beans and baking paper and set the crust aside until the filling is ready. While the mixture simmers on the stove, break the eggs into a bowl, add the cream cheese, cream and milk. Season with the grated nutmeg, salt and pepper. Whisk until everything is well combined and the mixture is showing some bubbles on the surface.

As soon as the Kohlrabi-minced beef is ready, evenly spread it over the crust and pour the egg-cream mixture into the tin. Sprinkle with parmesan, push into the oven and bake for 30-40 minutes. The top should be golden and the tip of a knife should come out of the quiche more or less clean.

Take the quiche out of the oven and let it rest for 5 minutes before taking it out of the tin. Serve with a green salad and enjoy!

Kohlrabi quiche 1

Kohlrabi quiche 2

Gorgonzola-Kohlrabi-Pasta Bake

I’m stuck at home with the first big cold of the season. Runny nose, sore throat, headache, fever…the whole package. Even my face hurts. And the worst thing of all is that my taste buds are completely out of order. I just had a “tarte flambée”, a very thin crust topped with sour cream, onions and bacon, a specialty from the region of Alsace in France, for dinner and I could just as well have eaten my shoes. It would have tasted the same. Fortunately, my husband assured me that it tasted great and that I’d have to make it again so I’ll have another go in a few days.

Thankfully, my taste buds were still functional a few days ago, when I made this pasta bake. I found the inspiration in the current issue of the french Saveurs Magazine where they presented a simple macaroni Gorgonzola pasta bake. It looked very tasty, but to have it as a complete meal, it lacked some vegetables. Kohlrabi sounded like a nice addition and I was pretty sure that its crunchiness and taste would complement the creaminess and strong flavors of the Gorgonzola very well.
Topped off with some panko, this was a delicious pasta bake, perfect for cold autumn evenings.

Ingredients for 2:

160g dry pasta (maccheroni or similiar)
1 big Kohlrabi or two small ones
60g Grogonzola *
enough milk to cover the pasta shapes (I didn’t measure the amount, but I guess it was about 400 ml)
salt, pepper and nutmeg to season
Panko flakes or bread crumps for the topping
30g butter

* It can be a bit more or a bit less, depending on whether you want your sauce to have a strong blue cheese or not. It’s best to add it in little bits and check the taste as you go.

Directions:

Preheat the oven to 180°C.

Peel the Kohlrabi and discard the stem (hard and stringy bit at the bottom). Cut it into little cubes.

Put the pasta into a pot and cover with the milk. Season with salt, pepper and nutmeg to taste. Turn up the heat and bring to a boil. As soon as the milk is boiling, reduce the heat to medium high in order to keep it bubbling. Watch the mixture at all times as boiling milk goes over board very quickly if you don’t stir it frequently.

When you’re halfway through cooking your pasta, add the Kohlrabi cubes to the milk and continue the cooking process until the pasta is al dente. I like the Kohlrabi to preserve some of its crunch, so a few minutes in the boiling milk are enough. If you want it to be completely cooked through, just add it to the pot a little sooner.

As soon as everything’s cooked to your liking, remove the pot from the eat and add the gorgonzola in spoonfuls. Stir the blue cheese into the mixture until everything is well combined. Taste and adjust the seasoning if necessary. Pour into an ovenproof dish, sprinkle with panko or bread crumbs and arrange several knobs of butter on top. This will make sure the crumbs become crisp and golden during the baking process.

Bake in the oven for about 30 minutes until the top is golden. Take out, let sit for 5 minutes to let it cool down a bit and enjoy!

Broccoli and purple cauliflower salad with cashews and garlic dressing

Let me introduce you to the most perfect beauties:

Broccoli and purple cauliflower. Broccoli has been a favourite in my kitchen for a long time, but I’d never seen purple broccoli before. I’d heard about all different kinds, like orange cauliflower, romanesco or the purple variety, but the only ones I’d actually seen around here are the classic white variety and the romanesco with its beautiful pointy roses.

So when I saw a few of these beauties on display at one of my favourites fruit and vegetable stalls at the weekly market in Luxembourg City, I jumped on the occasion and carried one home where I gave it the appropriate VIP treatment by having an extended photo shoot along with its green companion.

Now what to do with it? I didn’t want to cook the cauliflower to preserve the beautiful colour and I’d made a very nice salad, once again from Claus Meyer’s book, but using broccoli alone. But adding a splash of colour and additional flavour to the bowl wouldn’t hurt so I decided to make this salad again, with a few tweaks compared to the original recipe.

Claus Meyer’s recipe calls for Skyr, an icelandic dairy product, which of course I had no chance of finding here. The first time I made the salad, I used greek yoghurt as a replacement, and this time, I made the dressing with quark cheese. Both were equally good. I only used toasted, unsalted cashew nuts as a topping because I love them so much (compared to some other nuts) while Meyer uses a mix of different nut varieties. You could use whatever tastes best to you.

The result was a wonderfully flavoursome bowl full of colour and crunch. Not to mention it’s very healthy and filling. You could serve it as a side (I served it as a side to a hearty pasta bake the first time I made it) or as a balanced, healthy meal.

Ingredients (for four as a side or two as a main course):

One broccoli head
One purple cauliflower head (white cauliflower would work as well, of course)
250g greek yoghurt or quark cheese
1 big garlic clove (it can be smaller if you don’t want the garlic flavour to be too strong, especially if you make the dressing some time ahead)
a bunch of fresh chives, chopped
2 tablespoons
2 cups of the broccoli/cauliflower cooking water
1 tablespoon oil (preferably a nutty flavour, I used sesame oil)
a handful of cashew nuts, toasted
salt and pepper to taste

Directions:

Clean the broccoli and cauliflower and cut off the leaves. Then you will need to blanch your vegetables. I used different techniques the two times I made the dish and I found the second one to be quickest and easiest. The first method used was to divide the broccoli (and cauliflower) into little roses and blanch them. The second time, I just stuck the whole head (cleaned, of course) into the boiling water, holding it by the stem, and divided the heads into roses as soon as it had cooled down a bit. As I said, it is quicker and  I didn’t notice any difference in flavour or texture.

So, no matter which method you are using, bring a large pot of salted water to a boil, then add the vegetables and blanch for about 30 seconds. Scoop them out and set aside to cool (and divide into small roses if you’re using the second method). Save 2 cups of cooking water.

In the meantime, toast the cashews by placing them in a pan on relatively high heat, without adding any oil. Watch the nuts carefully to prevent them from burning and toss several times to make sure they toast evenly on both sides. Set aside.

To make the dressing, combine the yoghurt or quark cheese, oil and some of the reserved cooking water. You should add the water gradually to avoid the dressing to become too liquid. If you’re using quark cheese, you’ll need more water as the cheese has a firmer consistency than the greek yoghurt. The dressing should have a light, creamy texture, not too firm, not too runny. Add the crushed garlic, 2/3 of the chopped chives and season to taste with salt and pepper. Stir until the mixture is smooth.

To assemble, place a handful of broccoli and cauliflower roses into a bowl (I like to serve it in individual bowls as it looks prettier), dress with a couple of tablespoons of the garlic sauce and sprinkle with cashews and chives.

Enjoy!

Kéisstaart or cheesecake the luxembourgish way

I’ve finally bought a cookbook I’ve been eying for some time now. It’s THE bible of luxembourgish cooking and has been completely revamped a few months ago in order to appear more modern and in sync with the current zeitgeist. And it has photographs, something the previous versions didn’t have.

The book I’m talking about is the “Lëtzerbuerger Kachbuch” or “Luxembourgish Cookbook” by Ketty Thull. It was first published in 1946 and has since then been a loyal companion to most luxembourgish housewives. Of course, back in the day, the major aim of the book was to offer every woman advice on how to be the best possible housewife, including information on stocking a pantry, preserving produce, entertaining or managing a household budget. I love the fact that the brand new edition still included the old chapters on table manners, …

My mother used to cook from this book, and before her, my grandmother. And even if they’re not there anymore to teach me their recipes, I can still recreate some of my most beloved childhood dishes thanks to Ketty Thull. For me, luxembourgish food is simple, hearty and comforting, things that couldn’t exactly be labelled as low-calorie, but dishes that keep body and soul together. Some of my favourites as Gromperekichelcher (a kind of potato fritters prepared with onion and parsley and served with stewed apples), Kniddelen (flour dumplings served with bacon and stewed apples – yes, we love our stewed apples!) or Kéisstaart, the recipe I want to share with you today.

Kéisstaart is a very popular dessert here in Luxembourg, but it’s also well known in our neighbour countries Germany (Käsekuchen) and France (tarte au fromage blanc), for example. The same thing goes for a lot of luxembourgish dishes that have been influenced by the culinary traditions of many different countries. France, Germany, Belgium and Italy probably have probably had the biggest impact on our local cooking and eating habits so far.

I love Kéisstart because it is a very simple cake with only a few ingredients, but it comes with a delicate, both sweet and refreshing flavour. The buttery, crunchy crust perfectly complements the smooth, creamy texture of the cheese topping. Kéisstaart is made with what we call “wäisse Kéiss” which literally means “white cheese” and can be found under the term “fromage blanc” in France or “Quark” in Germany. It is quite similar to yoghurt in texture and is often eaten with fruit or cereal. However, I wouldn’t substitute it with yoghurt in this particular recipe.

I slightly adapted the recipe from the new edition of the “Lëtzebuerger Kachbuch”. I used a different method to make the crust, added some quark cheese in order to make it a bit softer and replaced the vanilla in the filling with tonka bean. If you’ve never tasted or smelled tonka bean, you should absolutely try it! It is an enchanting smell you will never forget!


Ingredients (for a 24 cm/9.5 inch Ø cake tin)

For the crust

250g all-purpose flour
125g unsalted butter, very cold, cut into cubes
80g sugar
1 egg
2 tablespoons “white cheese”/”Quark”
a pinch of salt

For the filling

500g Quark cheese (preferably no low-fat variety)
100ml liquid cream
4 egg yolks
2 egg whites
20g starch
135 g sugar
1/2 Tonka bean

Directions

Pour the flour into the mixing bowl of your stand mixer and add the very (!) cold butter cut into cubes. Make sure to take the butter out of the fridge and cut it at the very last minute. Using the flat beater on medium speed, beat until you get a flaky butter/flour mixture. Add the salt, sugar, egg and quark cheese and beat some more, just until everything is roughly combined. Your dough will still be rather flaky. Flour a working surface and your hands and pour the flaky dough onto your counter top and knead it into a ball.

Usually, recipes now call for at least 30 minutes refrigerating time. But I have taken a habit of refrigerating the dough at this point only if the butter is already starting to become slightly runny and shiny. If the dough ball is still reasonably cold, I either refrigerate it for up to 10 minutes or roll it out on a floured surface immediately. I know a lot of people wouldn’t agree, but this works best for me.

Thoroughly grease the cake tin. Roll the dough out, making sure that it is large enough to cover the side walls of the cake tin. Do this quickly if you do not want your dough to stick to the counter top! Transfer the dough into the tin. I usually detach it from the working surface with a spatula and fold it over once before transferring it to the tin where I unfold it again. I find the transfer to be safer that way. Cover the baking tin with cling film and refrigerate tin and crust for 30 minutes.

Preheat the oven to 180°C.

For the filling, combine the cheese, sugar, egg yolks, starch and grated tonka bean in a large bowl. Make sure to get an even and smooth texture. Whisk the cream until tiny bubbles form and add to the mixture. Finally beat the two egg whites until stiff and delicately incorporate them into the cheese mixture.

Go get your crust out of the fridge and pour the cheese mixture onto the crust. Bake in the oven for 55-60 minutes until the filling is set. If the top of the cake should brown too quickly, cover with tin foil.

Let cool in the tin for about 10 minutes, then take it out of the tin and set aside to cool on a cake rack. The filling will set further while it cools.


Gudden Appetit!

Raspberry Nectarine Popsicles

And another post in honor of our one week summer. The sun is actually shining at the moment, so I shouldn’t complain too much, but we’re down to 18°C again and that’s not really summer now, is it?
Anyway, popsicles are all over the internet at the moment and you can find a large variety of popsicle molds in the shops and of course, I couldn’t resist. I’ve bought three different types so far and the most practical and easy to use are definitely these Ice Pop molds. You can use them with the stick to make popsicles or without the stick and eat the ice cream from the mold.

This weekend, I had a few leftover nectarines lying around that needed to be taken care of rather quickly. And since I’d just bought my new popsicle molds, I didn’t need much pondering to figure out what I was going to do. The week before, I’d made mango orange pops and while they were delicious and refreshing, I wanted something a bit more creamy this time. So I mixed the nectarines with a cup of greek yoghurt and added a handful of raspberries to add an additional flavor and I must say, these two combine well as you can still taste both the nectarines and the raspberries without one of them being predominant.

While I don’t have kids yet, I can already see myself making these for them as I’m pretty sure they’ll love the colorful molds as well as the healthy popsicles just as much (or hopefully even more) than store bought ice pops.

Ingredients (for 4 popsicles) (I probably could have filled a 5th mold with the leftovers, but preferred to spoon the mixture out of the cup and eat it right away)

3 ripe nectarines
a handful of raspberries
150g greek yoghurt
1 tablespoon cane sugar (or to taste)

Directions:

Wash, peel and seed the nectarines. Roughly cut them into the pieces and mix them in a bowl with the yoghurt, sugar and raspberries. Puree with a hand blender.

Fill the popsicle molds with the liquid, firmly close the lids and place the molds in the freezer for at least 4 to 5 hours.

Andalusia

As you might have noticed, I haven’t been around much lately and I’ve neglected my poor blog quite a bit. But as with most things in life, there’s a good explanation. I’ve been very busy with other projects, such as … Continue reading